Alice's guitar gun (L.M.S)
A friend of mine wanted to go to the New York Comic Con in October cosplaying as Alice Cooper from the book Last Man Standing: Killbook of a Bounty Hunter by Dan Luvisi, and
asked me to make this for her. This is my first full tutorial.
STEP 1: OBTAINING REFERENCE IMAGES
It's always a good idea to have reference images for anything you make, so you are able to keep it as accurate as you can or want. Luckily for me, Dan LuVisi himself illustrated how he thought Alice and her guitar gun would look.
PART 1: THE BODY
STEP 2: DRAWING OUT THE PLANS
First, I drew out some templates for the body of the guitar. It appears to be a 60's style Stratocaster body, with an Ibanez pickup layout. I found some blueprints online and sketched out 3 templates, first the Strat body, then with the gun stock and mechanical parts, and finally with the gun stock without the mechanical parts.
STEP 3: GLUING THE LAYERS TOGETHER
Next, I glued multiple layers of poplar together to get the right thickness. The average Stratocaster guitar body thickness is 1.75". In order to glue these boards together, I had to stagger them so they didn't fall apart. Before I glue the boards together, I needed to plane one layer down 1/8" to get the right thickness.
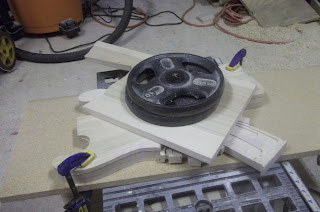
In order to keep the boards flat, a larger board was laid under the ones I was gluing and wax paper in between so any dripping glue wouldn't reach stick them together. Apply the glue. Spread out the glue with something flat. Add another layer of wax paper and wood. Clamp down the outer layers and pile on something heavy.
The boards finished gluing! Nice and flat as expected with some glue coming from the edges, but those aren't anything to worry about yet.
STEP 4: CUTTING OUT THE DESIGN
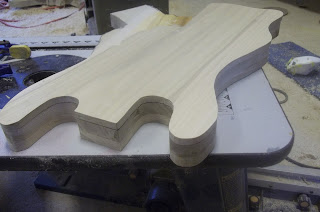
The first part to cut out is the front half, which is made from the template without the mechanical parts. I used a Skil brand jigsaw (Quick note: The blade's bearing moves a little on this brand's model which can make the edges angled in or out depending on the wood thickness and the blade being used).
In order to make the guitar body straight and flush, I decided to rough cut the back of the body, which I'll just call the second half. I used a washer as a spacer between the template for a rough outline to cut with the jigsaw. I'll use the router afterwards to get in close.
In order to make the guitar body straight and flush, I decided to rough cut the back of the body, which I'll just call the second half. I used a washer as a spacer between the template for a rough outline to cut with the jigsaw. I'll use the router afterwards to get in close.
And here are the two halves after using the flush trim bit. All flush and smooth! Well....mostly. Since this was my first time using a router (don't worry, I practiced a bit [that's a pun, get it? router bit??] before I used it), I did accidentally cut in the wood once or twice. This can be fixed later, though. Now I just use the jigsaw for the detail cutting on the mech area.
STEP 5: CARVING
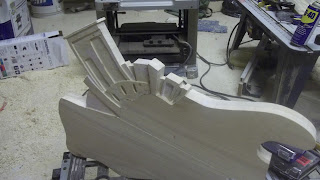
Now that the cutting is over for now, I can start carving the main exhibit of the body: the mechanical area. Since the front half board will be separating the mech parts from the rest of the body, I wanted to make the backside match. I used the router to drop the mech area down 1/8"; this is just enough to show separation when I paint. As you can see, the router left lots of burn marks and shallow recesses in the wood due the heat and the lack of a surface to keep it level.
Not to worry, though! I simply applied some bondo to the area, as well as to the mistakes I made with the router earlier. I smoothed it all out with a palm sander for the rough stuff and paper-on-block to flatten it.

Now I can actually start carving! Using my dremel with a routing attachment and the cylinder shaped high speed cutter, I carved the mech parts easily. The dremel was a bit uncontrollable in a few areas where it had almost nothing to keep the attachment flat, but I fixed that with (you guessed it!) bondo filler. I was surprised how well the bondo worked since I never used it before.
Here are the front and back sides finished being carved.
And now I rounded the edges on the first half where it meets with the mech parts since I won't be able to do it later when the halves are assembled.
I glued the pieces together using the same technique as last time.
After the boards dried together, I used a router to re-route the sides flush, and then round them out. I also did a little more clean-up on the mech parts.
With most of the bodywork done, I decided to make the pick-guard next.
Now I can use the pick-guard as a template for the recesses in the body for the pickups, knob, switch, and the pilot holes for the bridge. I continue to clean-up other areas as I carve. It's hard to see, but i noticed the stock of the gun wasn't parallel with the center line, so I went ahead and fixed nonparallel areas
I tested how everything fit, and it seemed to be perfect.
Here's a pic of the pickups. I ordered the plastic bobbins and wound gold bead wire around them. I cut and glued metal rods in one side of the humbucker pickups to represent the magnets. Since this will be an acoustic guitar with acoustic strings, the magnets will not be needed to amplify the sound. machine screw heads were glued in the other side of the humbuckers. they have no effect even in real guitars.
I cut some clear Lexan polycarbonate for the clear cover over the mech area. It's scratch resistant, slightly flexible, and lightweight.
It's time to start priming the body.
PART 2: THE NECK
STEP 7: DRAW AND CUT THE GUN DESIGN
Now that the body is carved, I can work on the gun section.
Glue the same way as with the body.
A rough cut of the gun section. The fret board will fit into a recess in this part and will attach to the body at the bottom of the gun handle and the bottom of the neck. See the picture for reference.
I salvaged a trigger and tension spring from a nerf gun. this will definitely make things easier.
STEP 8: CARVING THE GUN
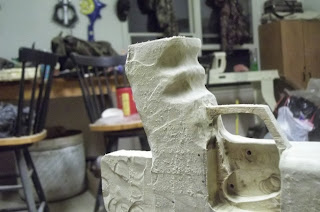
Here's the gun after some progress. The fret board can fit in the middle now and the exhaust holes are routed. A space was cleared for the trigger mechanism on the back of the guitar so you won't see it when the prop is finished.
As you can see behind the gun handle, the board was lowered halfway to fit into the body.
A close-up of the trigger mechanism fitted into the gun. A cover will be placed over the area to conceal it.
This next piece is a cover that will go over the string's tuning pegs to hide them. It's connected and opens via hinge and will stay closed with a magnetic spray when it's painting time.
If you look at the end of the gun in the previous picture, you will see it has an indent which I used to attach the last piece of the gun: the barrel and receiver. I drilled some holes for the barrels and cut out the piece that holds them together. I'll still need to carve these pieces.
And lastly, the muzzle brake. I drilled a hole for the barrel in the back and a fake barrel hole in the front for design effect.

Here you can see the track is finished. The keyholes are for one sight and the two raised pieces to the left are for another. They may not be usable sights, but they'll still look cool.
The handle is shaped next, and the gun section is now light and comfortable enough to hold with one hand.
All the edges on the gun are rounded and the only thing left is to bondo and finish sand.
STEP 10: PRIME THE GUN SECTION
Now the priming begins! I'll continue sanding and priming until I think it's ready for paint.
STEP 11: ENGRAVE THE FRETBOARD
With the body and gun sections finished, I need to inlay the fretboard. I ordered a rosewood board for the fretboard and drew on the fret slot lines to make sure I had enough.
I planed down the board smooth since it arrived with circular saw cuts evident. The fret board has a vine design of a lighter color. So I drew it out and engraved it.
It turned out a lot better than I expected. Now I'll fill in the design with wood filler to give it the lighter color.
STEP 12: FRET THE NECK
Next I cut the slots with a hacksaw and test fit the fret wire. I also cut slots in the nut which the strings will be pulled over just before the tuning bolts.
STEP 13: ASSEMBLY
Now I can test fit the fretboard one last time in the gun section before I paint. The pilot holes for the eye bolt tuning pegs are also visible. Yes, I did test out how the tuning works and I can get it pretty tight and the bolt doesn't slip.
You may have noticed the bottom of the gun handle was not carved. That was because I was building up bondo so I could seamlessly attach the neck and body. All that was left was to screw the two pieces together at the neck plate on the back of the guitar to hold it all together. I continued to sand and smooth and finally primed the guitar for the last time.
First the white was painted for the body. I used multiple light coats instead of a few heavy coats to prevent dripping.
Then some of Rustoleum's Leak Seal rubber spray, similar to Flexseal. Again, light coats were used since this spray is already pretty heavy being rubber and all.
Next, the detail painting was added on the mech area.
I had to wait to drill the holes for the strap buttons until the rubber spray was applied otherwise it would have been filled. A hole was also drilled for the pikachu keychain that hangs off the stock. The pikachu was my first mini sculpt, so please be gentle. I used bondo piled up and then carved.
STEP 16: FINAL STAGES
The only thing left is to set all the pieces into place: bridge, pickups, switch, knob, bolts, and buttons. The strings don't play as well as I had hoped because the nut was too low which can be fixed later on. And here's the final product!


