Monday, August 11, 2014

Aquaman's Trident (New 52 Version)


     I've always wanted to make a trident since before I started making props. I made one before when I didn't have that much experience and it didn't turn out as well as I would have liked.  I got a commission request for one and I gladly accepted it to redeem myself.


STEP ONE: DRAWING AND CUTTING


I free-handed the trident head onto some poplar wood. I'm using red oak for the poles for it's strength even though it comes with the added problem of the grain showing through, but we can fix that.


I cut it out using a jigsaw. I cut out a second one under the first to keep the parts from breaking off from the force of the saw.


Here's a rough idea of how the trident will look:


STEP TWO: SHAPING


Side shafts are shaped


More rounding


I applied bondo onto the pole where I shaped and turned it on my lathe to get it perfectly round. I also drilled holes into the ends of the poles for the screws and bolts since the buyer wanted it to come apart for easy travel.


I decided to try out some bondo spot putty someone recommended, and it worked great for smoothing the surface. 


You can see the wood grain showing through the filler and sandable primer.


STEP THREE: SANDING

I applied spot putty on the poles to fill in the grain., and primed the head piece.


I sanded the putty and primed the poles again and there's no more grain showing. This stuff is great!


I JB. Welded the screws and bolts in, but... the head cured crooked because the bottom of the ring wasn't flat.


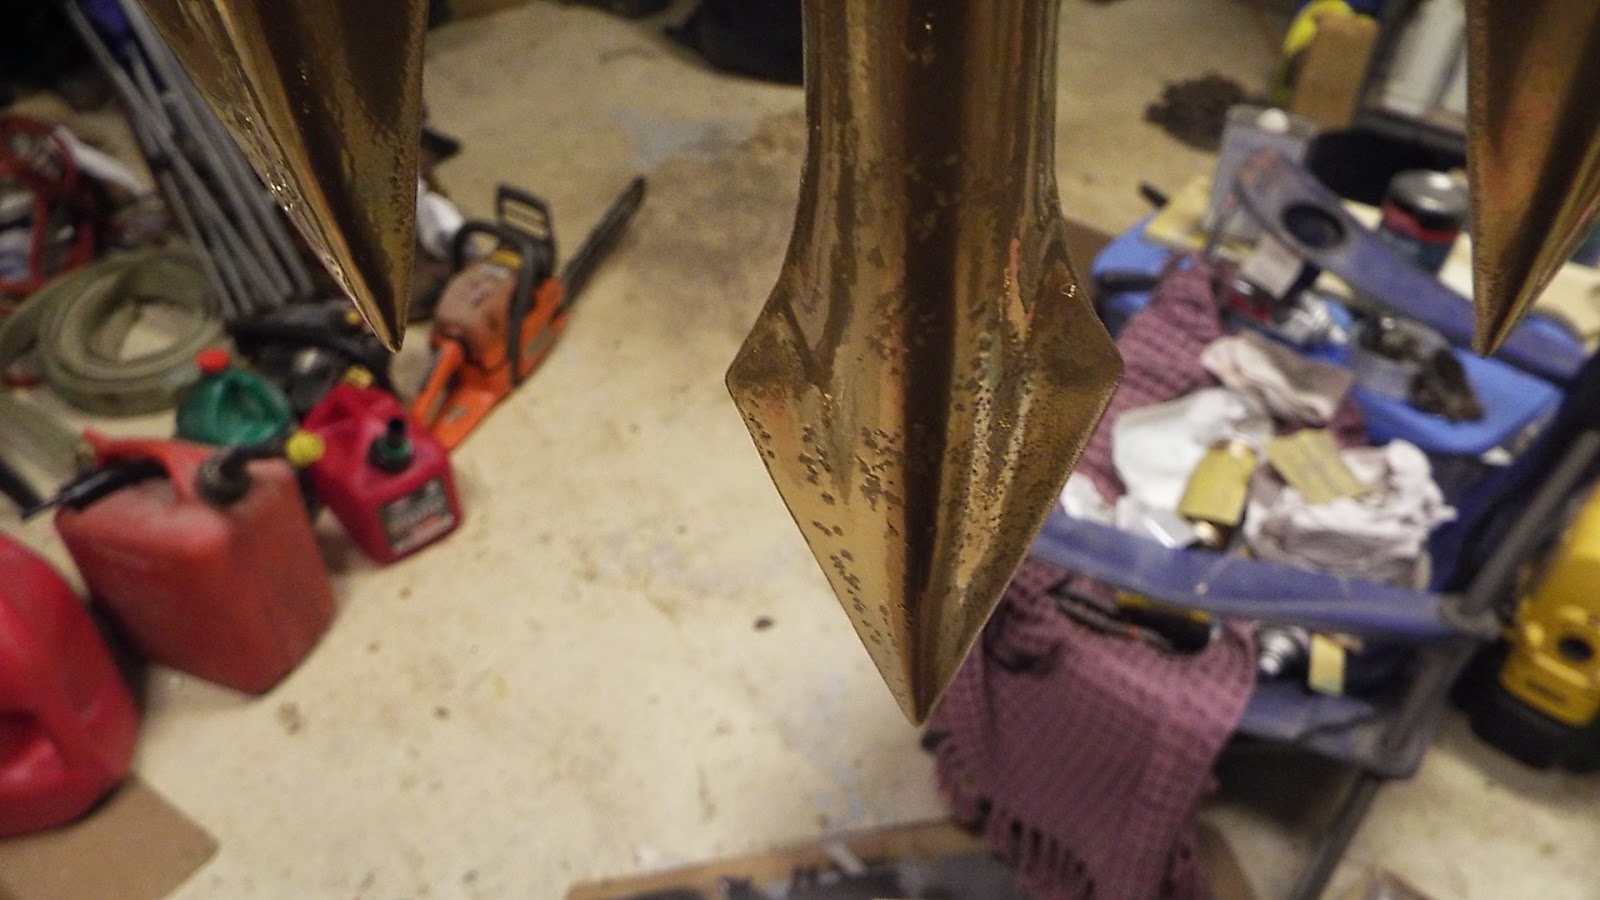
So I sanded some more, primed again, and sanded and polished it up to 0000 steel wool.


Now it's straight! 


STEP  4 : MOLDING AND CASTING


Materials: 2 gallons of Moldstar 15, sealant mixing containers and some sulfur-free clay. It should be noted that moldstar  is a platinum rubber and won't cure with clay that has sulfur in it.


I built up some foam under the head to compensate for the ring on the bottom being so wide.


Then I built clay around it and a foam board wall. I know it looks wonky with all the colors, but it was available and sulfur-free.


First half poured. It took 36 ounces to fill it in enough to cover the top of the ring at the base by a half inch.


Next I poured the second half, and the trident head mold is complete!


The next mold will be the trident pole. I needed a lot more clay to make this mold, so I ordered some called Sculptex that's sulfur-free for moldmaking. It took a little more than 9, 1 pound slabs to encompass the pole. Add some registry keys and feed tubes and we're ready to pour.


First half is done! I didn't even have to use sealant on the clay (I actually forgot to), it just turned out great and peeled off as if there was sealant on it. I really recommend Sculptex. It's only $3.30 a pound.


I don't have pictures of the next sections, but I finished the mold by putting up wooden walls this time with foam board lined on the inside to flex a little and be snug with the rubber.
 The first 2 casts had large bubbles running along the center, so I had to add more vents/feed tubes. 
The third cast was bent on the bottom end with the large pommel because something pushed the very end of the mold.

Here's the fourth cast of the pole lookin very nice. It only needs some sanding. The second cast of the trident head turned out pretty good, too.


As you can see, there are still some bubbles, but I'll be filling them in with Bondo Glass epoxy before I started sanding, making sure to rough the inside of the bubble so it adheres better.


STEP 5: PAINT

I'll be editing this section as soon as I finish the plastic version, but the buyer wanted the wooden master since I wouldn't be able to finish the cast in time for their con. 

As you saw before, the piece was primed:


There was still clay and sealant on the piece so I wiped it down with alcohol, reprimed it, and sanded it smooth again. Next, I sprayed Montana's Gold Chrome on the pieces and I have to say the paint itself looks amazing! A near mirror finish! 

However, for some reason, fish eyes kept showing up in the paint after multiple coats and after wiping down with alcohol again and letting it dry. 


I put on a final coat, and it seemed to cover a little more.
The buyer wanted it the next day, so I just had to leave it alone like that or else it would be tacky. They wanted it as it for their cosplay at a con. 


Here's the finished product (for right now).


Saturday, July 12, 2014

Young Xehanort's Keyblade (KH3D)

Young Xehanort's Keyblade


  So there weren't that many reference pictures to go off of with this keyblade since you can't wield it in KH3D, and only see it while fighting young master Xehanort. There was some line art from a guide book which was really helpful as well. 
   I've made 2 versions in the past before I knew about bondo, so they turned out bumpy and misshapen. I just wasn't happy with how they turned out, which is the main reason I decided to take this on one more time. 


--------------------------------------------------------------------------------

STEP ONE: DRAWING AND CUTTING

  The first step I take for any prop I build is sketching out the design. I do this by taking the length I want the life size version to be, and dividing it by the length of a picture of it. I can multiply this ratio times any measured length of the picture and get the life size length. Next I plot the points onto foam board, or the material I'm working with, and sketch the rest of the design.


   I decided to make a foam template and then filling in the details. Then I cut out 3 layers of this design using the template to make it the right thickness and glue them all together, using clamps to hold them together. Make sure to check up on the clamps every now and then when you glue things together in case the layers slide around.


---------------------------------------------------------------------------------

STEP 2: CARVING

   The next step was to carve away the design. I started by shaping the wings. using a dremel with a sanding bit.


Then, I lowered the handle guard thickness using a hand-router to make it smooth and remove wood faster. I did the same with the gears, but a little lower, and removed some of the wood from the part between the wings.


After some sanding of the wings, routing the clock and other parts, spiraling the handle and removing some wood from the blade with the dremel: 


I used the hand router again to lower the clock area, and remove some of the recessed areas on the blade. I decided to make the clock hands separate this time to shape them better and ensure the clock area was completely flat. I'll also be engraving numbers into the clock later.


Every now and then, I sprayed sandable primer on the key so I could see the details, bumps, and scratches a little better and add bondo where necessary.


-------------------------------------------------------------------------------------

STEP 3: PAINT

  Here's what the keyblade looks like primed with a final coat of sandable primer, with the clock hands white and ready for painting.


Here you can see the clock hands with a few thin coats of blue glow in the dark paint.


The resin eye was cast using a rubber/plastic tablespoon.


Next, I primed the keyblade white so the colors weren't affected by the dark primer, which was mainly just in case I needed to sand more.


Purple areas taped and spray painted using Folk Art's royal violet acrylic paint using my new spraygun. All the color paint I used was Folk Art acrylic paint from the tube. Less than a dollar at retail stores.


In the past, I used pearl white on the wings and clock area, but the color never really showed up in tests, so I used sterling silver.


I mixed a bit of gunmetal gray with the sterling silver to fade the tips.


And here, the aztec gold, sapphire blue, nutmeg brown with a bit of black, and the black paints are finished. All that's left is the glow paint.


I got the glow paint from glonation.com. It's the bright glow blue paint. I do have to say that while it's nice I didn't have to add a thinner and could spray it, it peels like latex so I had to be careful not to spray too thick at once. However, the paint was built up on top of the tape, so when I went to remove it, the paint started to come up a little. 
This doesn't sand easily because it's a latex paint, so it left a bit of build-up where it meets the brown of the clock. A solution would be to spray a thin coat, then either lift the edge of the tape while it's drying or use an x-acto knife after every one or two layers to separate the tape.

 After the second coat: 


-----------------------------------------------------------------------------------

STEP FOUR: THE KEYCHAIN

The keychain pendant for this keyblade is an hourglass, since it's a time controlling keyblade and such. I started by cutting 8 squares out of thin mdf. I drilled holes in the corners, and one large one in the center of 4 of them. I glued these 4 on top of the untouched 4. Then, I rounded and shaped the hourglass piece on my lathe, and placed it into the squares in the large recess we cut out earlier. I placed 4 dowels into the four holes in the corners.


I cast the hourglass using moldmax 30 and clearcast resin, and shapes the dowels using my lathe and dremel.


I rounded the end pieces with my dremel, drilled holes in the top for a chain, and painted it gloss black. 


STEP FIVE: PROFIT?


--------------------------------------------------------------------------------

The pictures below are comparisons to the version I made before this one. I knew taking those pictures would come in handy, even though I hated how it looked.


Thanks for taking a look at my blog! I post updates regularly on facebook and tumblr, as well as deviantart.